Showing posts with label blog hop. Show all posts

The Rubber Café Blog Hop

Dec 11, 2012


Today is the day to celebrate brand new releases by The Rubber Café!

These new stamps were designed by the incredibly talented Jamie Dougherty. You are just going to love these stamps. They are versatile, fun, and I LOVE THEM!!

Today you'll be hopping with:

-------------------------------------------

NEW RELEASES:

We continue celebrating our new Jamie Dougherty Designs releases. These exclusive stamps are available for purchase at The Rubber Cafe Store!

These releases are perfect to use in your Project Life scrapbooks, mini albums, or projects you are currently working on. They are great with cards throughout the year as well. These sets are are beautifully done in Jamie's typical style and truly reflect her creative talent!


-------------------------------------------


One of the great things about these stamps is not only do they make great cards but they can also be used in your Project Life albums as well.

pl-page1-full

As soon as I saw these designs, I knew I wanted to use them in my Project life album!
 
pl-page1-washi
I first started with my weekly card using the small polkadot from the Don't be Wishy Washi set to anchor my diecut. That is my all-time favorite of the washis! 

pl-page1
I also used the round frame and Those moments when sentiment from the Remember the Moments set.

pl-page1-frame
The I created my mat for my first photo using the solid photo frame from the Pictures Framed  set.

It was so fun making the various cards and accents I was using for this week. Here are a bunch of them I made up ahead of time.  


mc-projectlife


Here are some pictures of my journaling and each card:

pl-page1-card1
pl-page1-card4
pl-page1-card5
pl-page1-card6

pl-page1-card8
and finally a full view of my first week of Project Life. I’ve taken the plunge and I love it!

pl-page1-full 
Hope you’ve enjoyed my project share. Don’t forget to visit the other talented designers showcasing the new stamp releases by The Rubber Café!


Supplies Used:

Stamps - The Rubber Café - Don't be Wishy Washi, Remember the Moments, What a Week, Pictures Framed
Adhesive – The Rubber Café Scrap Happy Glue, Foam Squares
Paper – The Rubber Café Pugnacious Signature Paper, Crème, Iron Orchid Designs, Loolah,
Inks – Memento, Lady Bug, Desert Sand, Rich Cocoa, Toffee Crunch, Pepples Sea Foam Green
Misc – Jellie Dots Holly Berry Red, Twine, Making Memories Ribbon
Accessories – Tim Holtz Tiny Attacher, Sewing Maching, Yellow Thread

-------------------------------------------


PRIZES:


The Rubber Café is giving away a GRAND PRIZE away for one blog hop participant. To be eligible simply:

  1. Comment on ALL blog hop destinations including The Rubber Cafe  Blog.

  2. Subscribe to The Rubber Cafe Blog

Want more ways to enter? For each addition task below, you’ll receive an ADDITIONAL ENTRY. Please comment on The Rubber café main blog post with a link to let us know you have earned an additional entry. Good luck!

  1. Become a fan of our Facebook page

  2. Share our blog hop announcement on Facebook

  3. Follow us on Pinterest!

  4. Pin our Blog Hop image to Pinterest

EARN A TRIPLE ENTRY for signing up for The Rubber Cafe newsletter HERE!
Contest ends Wednesday, December 12, 2012 midnight CST. Winner will be announced Monday December 17, 2012. GOOD LUCK!


Good luck!
Michele

The Rubber Café New Release Blog Hop

Aug 27, 2012

The Rubber Cafe Blog Hop
Welcome to The Rubber Cafe new release blog hop. This is Day #1 and you'll be hopping with Tesa Broman and myself!!

If you just happened to visit my blog today and would like to start the BLOG HOP from the beginning, simply follow THIS LINK to be taken to The Rubber Cafe blog to begin the celebration.

There will be a Grand Prize for one lucky winner plus smaller prizes along the way. . . so be sure to stop at each blog and leave a comment to be registered. Don't forget to also leave a comment on each main blog post at The Rubber Cafe too.

We are celebrating the newest release called:

on-the-fence-bundle
On the Fence

This bundle comes with a brand new exclusive die template manufactured by Spellbinders Paper Arts called On the Fence Die!

What makes this die unique? It's versatility! At first glance, you might see just a fence but soon you'll realize it can be so much more.

To see exactly what I mean, let me show you two cards I created using the On the Fence Die.

card1d
card-2c

Can you tell what elements were created with this die?  If you guessed the yellow vellum pieces then you were correct! Let me show you how I made these.

Vellum Flower Tutorial:

1.   Fold vellum a little bit wider than the width of the Fence Die and run through the Spellbinders Grand Calibur machine. I was able to cut 5 fences with one swipe of the machine using the vellum.

vellum  cuttingout

2. Using only one fence cut, fold each fence post in half lengthwise

folding3
3.  Trim bottom edge of the fence posts to the same angle as the top

cutting

4.   Accordion fold the fence and squeeze tightly

accordion  folding1

5.   Then fold in half one way and then the other way so you get something that looks like this with a great fold in each direction:

folding2
6.  Where the two edges of the fence meet, place a bit of glue and adhere both sides.

gluing

YOU CAN STOP HERE if you want the embellishment in the card below. You just simply spread the accordion apart for however long you would like it.

open-rosette
I simply layered my sentiment from the Friends set over the top and dove-tailed the edges

card-2b
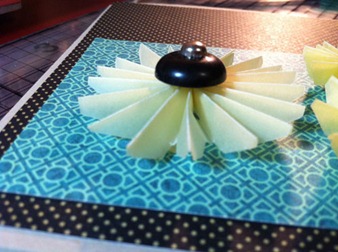
7.  To create the rosettes, simply glue the rest of the accordion pleats together with a very small amount of Scrap Happy Sheer Glue. This glue is perfect for vellum!

rosette
8.   Adhere your favorite vintage buttons to the top of your rosette to create an adorable flower.

flower
9.  Finally assemble your card

putting-together
You can create so many different looks just by changing the buttons 


card1c
To vary the sizes, I simply trimmed the height of my fence die and followed the same steps as above.

card-2c

I hope you’ve enjoyed my tutorial today and are inspired to think outside the box with the very versatile On the Fence Die by The Rubber Café!

Follow us on the blog hop each day from August 27-31 to find out what all this die can do.

-----------------------------------

BONUS: I will also be picking a mini blog hop winner from the visitors who post comments on my blog. I will put together a little rack of scrappy goodness to the lucky winner! Simply follow my blog and leave a comment to be eligible. I will draw a name on Monday 9/3 and announce it here on my blog. Please be sure to leave a comment by Sunday 9/2 to be eligible. Winner will have 24 hours to contact me.

Good luck!
Michele

Really Reasonable Ribbon/The Rubber Cafe Blog Hop!

Apr 13, 2012

Today is the day for the Really Reasonable Ribbon and The Rubber Cafe Blog Hop!


If you just happened to stop by my blog today and would like to start from the beginning, click on The Rubber cafe link HERE to start from the beginning. If you've come from Corri's blog then you are in the right spot!

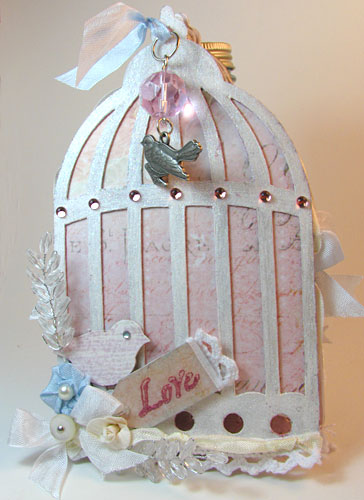
For my project, I worked up a mini-album using some gorgeous ribbons and trims from Really Reasonable Ribbon and some of my favorite stamps from The Rubber Cafe. You know Mother's Day is just around the corner and this album would be a great gift idea!


I LOVE this birdcage and as soon as I received it, I knew I wanted to use it for this hop. There's plenty of room for embellishments, photos, and journaling. That's perfect when playing with ribbon and stamps! Here's how I made the album.

I first painted it with Eco Green Crafts White paint. . .


  and then glittered the inside front cover with You're So Fine Glitter, Princess Pink


 and the outside in YSF Glitter, Diamond Clear Cool Highlight.
  

Next I used one of my favorite tools, the Stick Em Up Tool, to place the Jellie Dots, Cotton Candy along the top bar of the cage.


Isn't that gorgeous against the glitter??!


I then went to work with those GORGEOUS ribbons! Look at how beautiful they are. I used the Light Blue Seam Binding to make a satin ribbon flower. These flowers are really quick and easy when using homemade glue dots from the Scrap Happy Glue.

Next I tied a bow with the White Seam Binding and started to work on my love tag.


Since I couldn't find exactly what I had in mind in my stash, I decided to just make my own tag. Did you know that you can stamp with Scrap Happy Glue?  Well you can and I LOVE that!


I stamped the Love sentiment from the Fabulous Phrases set using the glue and then burnished the Princess Pink You're So Fine Glitter with my finger. Then I topped it off with a little bit of Diamond Glaze and voila. . . a homemade tag that's perfect for your project!


I also added some beautiful Amelia White Crochet Lace to the bottom of the birdcage along with some Cream Seam Binding.

Next I started working on the inside pages of my album. Here I used the Cream Seam Binding again but I knotted it every few inches to give it some interest. I really like the look of the ribbon this way.


I also used my Spellbinder Grand Calibur and the Labels Four Small 2 Die to create a tag for a photo or memorabilia.


I created another photo mat by using that same die and our Background Basic 2 stamp. That stamp is perfect for creating journal lines but it's also great for customizing your own background paper too. Then I just pleated and glued some more of the Cream Seam Binding.


I used this same technique for the paper on this mini-pocket. On my cardstock I stamped Tim Holtz Distress Ink Aged Paper with the 18th Century Proclamation stamp to get just the right look I was going for. I trimmed it with a fussy cut doily and added Jellie Dots Pearls as an accent.

Speaking of pockets . . I also created several pockets using the ribbon. Here are just a few of them:


See how easy it is to create a mock pocket?  The tag I stamped with the Roaring 20's Placard stamp. I'll be adding more photos and accessories as I complete my album.


You could tuck many tags under the White Satin Ribbon here!

Sometimes when working on a larger project, you might find yourself in a pinch and run out of the perfect paper for your theme. Well don't worry. Use your stamps and embossing powders to customize your paper.


Since I have birds and butterflies in this album, I used the beautiful butterfly from the Butterfly Set to create the embossed image.


Next I needed to make another flower so I chose to use some more of the Amelia White Crochet Lace.


The center is simply a smaller tighter version in Cream Seam Binding. I think they are really cute together. If you haven't seen how to make these flowers with the Scrap Happy Glue, you should watch Melissa's video. Lots of tips and tricks there. It's a must see.

I'll leave you with a few more pictures of the last few pages. 


On the back cover I used Diamond Glaze to give her wings some added dimension.


and on the front I made a charm out of a Tim Holtz finding and a glass bead I had in my stash.


I do hope you've enjoyed my project and I hope it gets you motivated to create that special gift for someone on Mother's Day! 

Supplies Used:

Cardstock: Prima Fairy Belle collection
Stamps: The Rubber Cafe Background Basic 2, 18th Century Proclamation, Roaring 20's Placard, Vintage Treasures, Steampunk Charity Wings, Butterfly Set, Fabulous Phrases
Ink: Tim Holtz Old Paper, Spun Sugar, Eco Green Crafts White paint.
Glue: The Rubber Cafe Scrap Happy Glue
Ribbon: Really Reasonable Ribbon Cream Seam Binding, Light Blue Seam Binding, White Seam Binding, Amelia White Crochet Lace, White Satin Ribbon
Accessories: The Rubber Cafe You're So Fine Glitter, Princess Pink, YSF Glitter, Diamond Clear Cool Highlight,  Stick Em Up Tool, Jellie Dots, Cotton Candy, Jellie Dots, Crystal Clear, Jellie Dots Pearl, Tim Holtz charm, beads from stash
Dies: Spellbinders Grand Calibur,  Labels Four Small 2, Labels One

PRIZE: 

Yes I am giving away a little prize worth $15 in scrapping supplies! I am putting together a little kit of some of my favorite papers and goodies to one lucky winner. Just be sure to leave a comment on all the blogs in this hop and become a follower to be eligible! I will pick a winner via RANDOM.org and announce it in one week. GOOD LUCK!!

You're next stop on the blog hop is

CHERYL

Have fun!

~ Michele

Blog contents © Creative Mayhem 2010. Blogger Theme by Nymphont.