Showing posts with label inspiration. Show all posts

The Rubber Café New Release Blog Hop

Aug 27, 2012

The Rubber Cafe Blog Hop
Welcome to The Rubber Cafe new release blog hop. This is Day #1 and you'll be hopping with Tesa Broman and myself!!

If you just happened to visit my blog today and would like to start the BLOG HOP from the beginning, simply follow THIS LINK to be taken to The Rubber Cafe blog to begin the celebration.

There will be a Grand Prize for one lucky winner plus smaller prizes along the way. . . so be sure to stop at each blog and leave a comment to be registered. Don't forget to also leave a comment on each main blog post at The Rubber Cafe too.

We are celebrating the newest release called:

on-the-fence-bundle
On the Fence

This bundle comes with a brand new exclusive die template manufactured by Spellbinders Paper Arts called On the Fence Die!

What makes this die unique? It's versatility! At first glance, you might see just a fence but soon you'll realize it can be so much more.

To see exactly what I mean, let me show you two cards I created using the On the Fence Die.

card1d
card-2c

Can you tell what elements were created with this die?  If you guessed the yellow vellum pieces then you were correct! Let me show you how I made these.

Vellum Flower Tutorial:

1.   Fold vellum a little bit wider than the width of the Fence Die and run through the Spellbinders Grand Calibur machine. I was able to cut 5 fences with one swipe of the machine using the vellum.

vellum  cuttingout

2. Using only one fence cut, fold each fence post in half lengthwise

folding3
3.  Trim bottom edge of the fence posts to the same angle as the top

cutting

4.   Accordion fold the fence and squeeze tightly

accordion  folding1

5.   Then fold in half one way and then the other way so you get something that looks like this with a great fold in each direction:

folding2
6.  Where the two edges of the fence meet, place a bit of glue and adhere both sides.

gluing

YOU CAN STOP HERE if you want the embellishment in the card below. You just simply spread the accordion apart for however long you would like it.

open-rosette
I simply layered my sentiment from the Friends set over the top and dove-tailed the edges

card-2b
7.  To create the rosettes, simply glue the rest of the accordion pleats together with a very small amount of Scrap Happy Sheer Glue. This glue is perfect for vellum!

rosette
8.   Adhere your favorite vintage buttons to the top of your rosette to create an adorable flower.
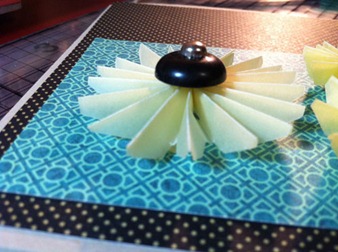
flower
9.  Finally assemble your card

putting-together
You can create so many different looks just by changing the buttons 


card1c
To vary the sizes, I simply trimmed the height of my fence die and followed the same steps as above.

card-2c

I hope you’ve enjoyed my tutorial today and are inspired to think outside the box with the very versatile On the Fence Die by The Rubber Café!

Follow us on the blog hop each day from August 27-31 to find out what all this die can do.

-----------------------------------

BONUS: I will also be picking a mini blog hop winner from the visitors who post comments on my blog. I will put together a little rack of scrappy goodness to the lucky winner! Simply follow my blog and leave a comment to be eligible. I will draw a name on Monday 9/3 and announce it here on my blog. Please be sure to leave a comment by Sunday 9/2 to be eligible. Winner will have 24 hours to contact me.

Good luck!
Michele

TRC/Faber-Castell Blog Hop!

Jun 6, 2012

Welcome to The Rubber Cafe/Faber-Castell Design Memory Craft blog hop!

If you've just joined us today and would like to start the blog hop from the beginning, simply click on The Rubber Cafe blog to begin. If you've come here from Mou Saha 's blog, then you’re in the right place!


For this blog hop, we will be showcasing project ideas, inspiration, and tutorials featuring fabulous products you won't want to miss!  Hop along with us as we work with products from these great companies:

The Rubber Cafe
The Rubber Cafe is a stamp manufacturer of high quality, deeply etched stamps and other fine paper crafting tools and accessories. All of our beautiful stamps are made right here in the USA in sunny San Diego, California!

Visit http://www.therubbercafe.com today to view their complete product line!


Faber-Castell Design Memory Craft
Faber-Castell Design Memory Craft was founded more than 240 years ago in Germany as a pencil manufacturer. Today Faber-Castell is world renowned for its high quality, professional art supplies in the Art & Graphic line, as well as its fine writing instruments and accessories.

Too see their complete product line, visit http://www.fabercastell.com.

---------------------------------------------------------------

For my project, I created this cute little banner for a friend of mine to decorate her scrap area.

banner-full

When I first received the wonderful products from Faber-Castell Design Memory Craft, I was determined to make something shabby with it! Even though the colors are so vibrant and beautiful I just knew they would be equally as beautiful in a muted tone.

So I got to work!


step-out-gelato2


To create the pennants I used watercolor paper and four Gelatos (Pistachio, Metallic Blueberry, Metallic Melon, and Lemon) along with the baby wipe technique I learned from Moe Saha when we worked together at the Orlando Scrapbook Expo. (She showed me so many wonderful things! Thanks Moe!)

That’s right this technique uses a baby wipe! You simply apply your colors next to each other and go over each color with a baby wipe to blend. You just want to make sure you use a clean area of the wipe for each color. Then come back and blend any sections necessary into one another. That’s it! 

It’s very quick and easy and blends so nicely. It leaves just the right amount of gelatos to achieve a more muted color that fits so well with my shabby chic heart!

I also started to make the adorable awning with the BRAND NEW On the Fence Bundle stamp and custom die set from The Rubber Café!

banner-left-closeup2

I
love how the background stamp and clear embossing really gives that awning a shabby texture. Isn’t it great?  

Then I got to work on my flower embellishment for the center pennant.

banner-middle-closeup
Here are the supplies: 

step-out-stamps2

This time working with the Faber-Castell Aquarelles in these beautiful colors. Since Aquarelles are watercolor pencils I was able to blend beautifully the exact colors I needed to highlight the large flower in the the Asian Floral stamp set.

step-out-stamps
After sewing around the edges of the pennant and adhering all of my sayings and embellishments, I had a really nice banner that will hopefully brighten my friend’s day.

Here are additional pictures of each panel:

banner-left

banner-left-closeup2

banner-left2

banner-middle

I
hope you’ve enjoyed my project today and I encourage you to try something new today.

Supplies Used:

Stamps: Asian Floral The Rubber Café, Friends The Rubber Café
Paper: Watercolor paper, Pugnacious Signature Paper Crème
Ink/Pencils: Aquarelles Faber-Castell Design Memory Craft, Gelatos Faber-Castell Design Memory Craft, Memento Rich Cocoa 
Dies: Spellbinders Grand Calibur,  S5-029 Nested Lacey Pennants;  DT-1 TRC Fence Custom Die Template by Spellbinders, S5-086 Bitty Blossoms
Accessories: Chipboard Letter, Water Brush, Faber-Castell Deluxe Water Brush, Jellie Dots Pearl,  Seam Binding Really Reasonable Ribbon, Versamark Watermark Pad, Embossing Powder Clear, Scrap Happy Sheer Glue, Glue Gun 

---------------------------------------------------------------


For your next stop on the hop, you'll be visiting Tesa Broman.


Don't forget to leave a comment on each manufacturer and designer's blog for a chance to win great prizes such as:


Faber-Castell Design Memory Craft will be giving away a $50 Gift Certificate!
The Rubber Cafe will be giving away TWO $25 Gift Certificates!


The blog hop contest will be open until midnight June 10th and the winners will be announced on June 12th on the company's blogs.


Here is a complete list of the designers participating in our blog hop:


START AT:  Rubber Café  http://blog.therubbercafe.com/
Cherry Nelson  http://cherrysjubileehome.blogspot.com/
Jennifer Matott  http://arttalk-sigmagirl.blogspot.com/
Melissa  Forsyth http://stamping-queen.blogspot.com
Irit Shalom  http://iritshalom.blogspot.com/
Mou Saha  http://collagecollagecollage.blogspot.com/
Michele Ciola  http://creative-mayhem.blogspot.com/  <<< You are Here!
Tesa Broman  http://tesasscrap.blogspot.com/
Rita Barakat http://letsembellish.blogspot.com/
Michelle Pearson http://inspirationblooms.blogspot.com/
Tiffany Johnson:  http://iheartartblog.com/
Kristine Reynolds  http://stampingandscrapingincalifornia.blogspot.com/
Karen Thede  http://imbydesign.blogspot.com/
Heidi Blankenship  http://embellished-dreams.blogspot.com/
END AT: Faber-Castell Design Memory Craft  http://designmemorycraft.typepad.com

Thanks for stopping by!

Michele

I Love You Card

Jan 24, 2012


It’s that time of year again when we break out the hearts, love and all things pink! This year is no exception. My favorite color is pink so I’m really happy to be using it more and more these next few weeks.

iloveu-carda

I made this card for the challenge over at Splitcoast Stampers using the Belleek Pottery tutorial. This was so much fun! 

iloveu-card

I used Tim Holtz ink Spun Sugar and a Cuttlebug embossing folder to achieve this look. I also used Spellbinders dies S5-030 Fancy Tags  Two #2 and S4-314 Lacey Ovals #2 and #4 with my Spellbinder Grand Calibur.

iloveu-cardb

I then stamped the I Love You from the K-1160 Just My Type set in the same color for the center. Finally I finished it off with some white pearl Jellie Dots. and some ribbon from my stash.

Thanks for looking! I love all these new techniques. You should give it a try if you haven’t already.

Happy crafting!

Michele

Vintage Dressform Blank Card

Jan 11, 2012


With the new year, I’ve made it my goal to create a stash of cards before I need them so I’m prepared when the time comes. I was thinking it would be great to have a set of all purpose cards that I could make for different occasions. Well here is what I came up with:

dressform-card

I used some Kaiser Kraft paper over kraft cardstock to form my base for the card. Then I used the J-1074 Frame Heart Stamp in Tim Holtz Distress Inks – Festive Berries over the patterned paper.

dressform-card3

Doesn’t that look pretty over that paper?


dressform-card2

I then covered this beautiful dress form in TRC-0010 Scrap Happy Glue and a mixture of G-120 You’re So Fine Glitter, Diva Pink and  G-101 You’re So Fine Glitter, Silver Medal. I then set the dress off even more with a few small rhinestones and a tiny piece of lace trim.

dressform-card4


For the smaller vintage embellishments I used a technique I saw on Pinterest of painting on your shrinky dinks with acrylic paint and then over-stamping them before shrinking.


dressform-card5

The acrylic gets a crackled look to it and with some sealer they would be fantastic for your next project! On the sheet above, I used the S-114 Vintage Treasures stamps set and the S-113 Steampunk Charity Wings set.


dressform-card

I hope you’ve been inspired today to get some of those extra cards made for your stash. You never know when you might need a card in a pinch. Better to have some on hand and prepared.


Happy crafting!

dtsignature-michele

Gift Idea: Card Set to Go!

Nov 19, 2011

I really love this week’s challenge to make a card set for gift-giving. There are so many possibilities with this one that it was hard to narrow down what I wanted to do. Then I saw this Card Pouch tutorial over at Splitcoast Stampers and I completely had to stop what I was working on and do it instead!

Do you ever do that? Stop in the middle of a project and change course? Well I’m sure glad I did. 
 cardset5

This little pouch is super easy to make and it came together quickly. I’m going to be making more of these to keep on hand for emergency gifts and also I think my daughter’s teacher will really enjoy something like this too.

cardset2

cardset

For the little cards I used the sentiments from the J-1095 Fabulous Phrases set. They fit perfectly in one of my hole punches I had in my stash.


Here’s a look at the inside of the card pouch. The card fits nicely inside.

cardset4

One other thing I got to play with was the T000-0001 Goosebumps texture spray. This product is so much fun! Just spray it on and let it dry. Easy peasy!

I wanted the outside of my pouch and the cards to look like they were covered in melting snow. This technique is great to do if you don’t want to have the look of embossing but want something fun for a texture.

cardset3

It does look like melting snow doesn’t it??

cardset6

You can really see the texture and the lovely sentiments in these photos. The ‘Get Well’ card is using less spray and the ‘Thanks’ card behind it is using an all over application of the spray.

cardset7

Well I hope you’ve enjoyed my project this week and are inspired to create your own. There’s just a little over a month left before Christmas and it will be here before you know it!

Supplies Used:


Stamps: J-1095 Fabulous Phrases
Paper: Cosmo Cricket More Holly, Bazzill Cardstock
Ink: Ranger Vintage Photo Distress Ink, Eco Green Paris Trunk 
Dies: Spellbinders™ Grand Calibur, S5-031 Fancy Tags Three #3
Accessories: Scrap Happy Glue, Dimensional Squares, Want2Scrap mini rhinestones

Happy crafting!

dtsignature-michele
Blog contents © Creative Mayhem 2010. Blogger Theme by Nymphont.