Thank you for joining us for day three of the Scrap-Mart Holiday Blog Hop! We'll be celebrating all things Christmas this week and want to thank you for joining us.

This blog hop has been brought to you by some fabulous companies such as:
- Boss Kut
- October Afternoon
- The Rubber Cafe <<= YOU ARE HERE
- Canvas Corp
- Heartfelt Creations
- Want2Scrap
- LaLa Land Crafts
- Sizzix
Each of the generous manufacturers will have prizes for you along the way so be sure to visit and complete the hop each day from Dec. 5th through Dec. 10th to be eligible to win. If you are just joining in, be sure to head over to the Scrap-Mart blog to start the hop from the beginning.
For my project today, I decided to make a present for another crafty friend of mine.
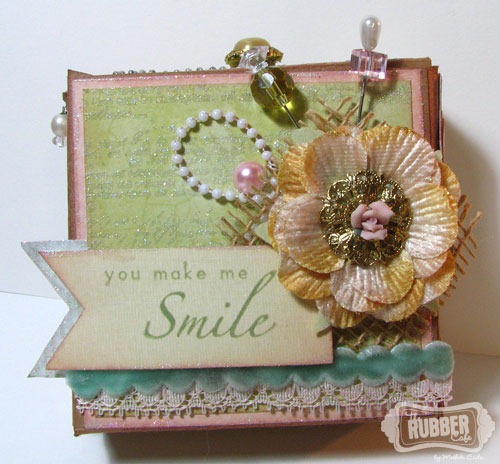
Since one of her favorite "go-to" adhesives (besides our Scrap Happy Glue of course) are the little adhesive dots, this will make the perfect gift for her.
Well did you know you can make any size adhesive dots you like with the Scrap Happy Glue??? Yes you can! So with that and the fact that she loves to have pretty things on her desk, I thought I would make her very own adhesive dot container!

This project was so much fun and easy to boot. For further details on how to make the dots, watch Melissa's fabulous "how-to" video.
So let's get started on making those last minute gifts. . . First we need to make the adhesive dots for the insert.
First cut 1 inch strips of parchment or freezer paper and adhere the dull sides together to make it two-sided. Then tape together at the ends to make it the length you want.

Next squeeze the Scrap Happy Glue onto the parchment strips according to the video guidelines. You can make these any size/shape you wish.

Next wind the adhesive dots onto a recycled glue dot spent spindle.

Now for the fun part! Decorating the box. I used a glue dot box and traced around it to make a template.

I used kraft cardstock for my base and Pink Paisley paper stamped with our I-987 18th Century Proclamation stamp using the G-101 You’re So Fine Glitter in Silver Medal.
I then stamped my sentiment from the J-1095 Fabulous Phrases set and matted it with coordinating cardstock.

Did you notice the extra sparkle around the edges? Well if you’ve ever wanted to apply a bit of sparkle to the edges without have to wait YEARS for it to try . . . then try this technique.
First place a small of glue onto a stamping block.

Then using an applicator such as a makeup sponge, apply to edges of cardstock.

Wait a minute or two for the glue to get tacky then simply rub the You’re So Fine Glitter into the glue and that’s it!

No waiting for the glue to dry. Once you’ve rubbed it in, you can keep on working. LOVE IT!!

Isn’t that gorgeous????? Now I’m going to have to glitter EVERYTHING!
Here’s the back of the box. I used the I-984 Pattern Royale stamp set with the Tim Holtz Vintage Photo Distress Ink along with S-113 Steampunk Charity Wings set on the back.

Check out the glitter on the bird! That technique works on so many different shapes too.
Here are the side views:

I used the 121007 Silver Jellie dots to add sparkle to each of the side.

and finally the top:

I hope you like my adhesive dots gift box tutorial and are inspired to make your crafty friends their very own box this holiday season!
Supplies Used:
 |  |  |
 |  |  |
 |  |  |

We hope you've enjoyed the hop so far and are inspired to create more holiday goodness this year!
Prize Information:
Don't forget to leave a comment here on The Rubber Cafe blog each day of the hop to be eligible for a $25 Gift Certificate to our online store! Earn extra entries for liking us on Facebook and following our blog if you haven't already. Be sure to let us know in your comments if you are taking advantage of the extra entries. Winners will be announced via our blog and Facebook on Monday, December 12, 2011.
Your next stop on the blog hop is: Canvas Corp
Happy Blog Hoppin!


