Showing posts with label really reasonable ribbon. Show all posts

TRC/Faber-Castell Blog Hop!

Jun 6, 2012

Welcome to The Rubber Cafe/Faber-Castell Design Memory Craft blog hop!

If you've just joined us today and would like to start the blog hop from the beginning, simply click on The Rubber Cafe blog to begin. If you've come here from Mou Saha 's blog, then you’re in the right place!


For this blog hop, we will be showcasing project ideas, inspiration, and tutorials featuring fabulous products you won't want to miss!  Hop along with us as we work with products from these great companies:

The Rubber Cafe
The Rubber Cafe is a stamp manufacturer of high quality, deeply etched stamps and other fine paper crafting tools and accessories. All of our beautiful stamps are made right here in the USA in sunny San Diego, California!

Visit http://www.therubbercafe.com today to view their complete product line!


Faber-Castell Design Memory Craft
Faber-Castell Design Memory Craft was founded more than 240 years ago in Germany as a pencil manufacturer. Today Faber-Castell is world renowned for its high quality, professional art supplies in the Art & Graphic line, as well as its fine writing instruments and accessories.

Too see their complete product line, visit http://www.fabercastell.com.

---------------------------------------------------------------

For my project, I created this cute little banner for a friend of mine to decorate her scrap area.

banner-full

When I first received the wonderful products from Faber-Castell Design Memory Craft, I was determined to make something shabby with it! Even though the colors are so vibrant and beautiful I just knew they would be equally as beautiful in a muted tone.

So I got to work!


step-out-gelato2


To create the pennants I used watercolor paper and four Gelatos (Pistachio, Metallic Blueberry, Metallic Melon, and Lemon) along with the baby wipe technique I learned from Moe Saha when we worked together at the Orlando Scrapbook Expo. (She showed me so many wonderful things! Thanks Moe!)

That’s right this technique uses a baby wipe! You simply apply your colors next to each other and go over each color with a baby wipe to blend. You just want to make sure you use a clean area of the wipe for each color. Then come back and blend any sections necessary into one another. That’s it! 

It’s very quick and easy and blends so nicely. It leaves just the right amount of gelatos to achieve a more muted color that fits so well with my shabby chic heart!

I also started to make the adorable awning with the BRAND NEW On the Fence Bundle stamp and custom die set from The Rubber Café!

banner-left-closeup2

I
love how the background stamp and clear embossing really gives that awning a shabby texture. Isn’t it great?  

Then I got to work on my flower embellishment for the center pennant.

banner-middle-closeup
Here are the supplies: 

step-out-stamps2

This time working with the Faber-Castell Aquarelles in these beautiful colors. Since Aquarelles are watercolor pencils I was able to blend beautifully the exact colors I needed to highlight the large flower in the the Asian Floral stamp set.

step-out-stamps
After sewing around the edges of the pennant and adhering all of my sayings and embellishments, I had a really nice banner that will hopefully brighten my friend’s day.

Here are additional pictures of each panel:

banner-left

banner-left-closeup2

banner-left2

banner-middle

I
hope you’ve enjoyed my project today and I encourage you to try something new today.

Supplies Used:

Stamps: Asian Floral The Rubber Café, Friends The Rubber Café
Paper: Watercolor paper, Pugnacious Signature Paper Crème
Ink/Pencils: Aquarelles Faber-Castell Design Memory Craft, Gelatos Faber-Castell Design Memory Craft, Memento Rich Cocoa 
Dies: Spellbinders Grand Calibur,  S5-029 Nested Lacey Pennants;  DT-1 TRC Fence Custom Die Template by Spellbinders, S5-086 Bitty Blossoms
Accessories: Chipboard Letter, Water Brush, Faber-Castell Deluxe Water Brush, Jellie Dots Pearl,  Seam Binding Really Reasonable Ribbon, Versamark Watermark Pad, Embossing Powder Clear, Scrap Happy Sheer Glue, Glue Gun 

---------------------------------------------------------------


For your next stop on the hop, you'll be visiting Tesa Broman.


Don't forget to leave a comment on each manufacturer and designer's blog for a chance to win great prizes such as:


Faber-Castell Design Memory Craft will be giving away a $50 Gift Certificate!
The Rubber Cafe will be giving away TWO $25 Gift Certificates!


The blog hop contest will be open until midnight June 10th and the winners will be announced on June 12th on the company's blogs.


Here is a complete list of the designers participating in our blog hop:


START AT:  Rubber Café  http://blog.therubbercafe.com/
Cherry Nelson  http://cherrysjubileehome.blogspot.com/
Jennifer Matott  http://arttalk-sigmagirl.blogspot.com/
Melissa  Forsyth http://stamping-queen.blogspot.com
Irit Shalom  http://iritshalom.blogspot.com/
Mou Saha  http://collagecollagecollage.blogspot.com/
Michele Ciola  http://creative-mayhem.blogspot.com/  <<< You are Here!
Tesa Broman  http://tesasscrap.blogspot.com/
Rita Barakat http://letsembellish.blogspot.com/
Michelle Pearson http://inspirationblooms.blogspot.com/
Tiffany Johnson:  http://iheartartblog.com/
Kristine Reynolds  http://stampingandscrapingincalifornia.blogspot.com/
Karen Thede  http://imbydesign.blogspot.com/
Heidi Blankenship  http://embellished-dreams.blogspot.com/
END AT: Faber-Castell Design Memory Craft  http://designmemorycraft.typepad.com

Thanks for stopping by!

Michele

Really Reasonable Ribbon/The Rubber Cafe Blog Hop!

Apr 13, 2012

Today is the day for the Really Reasonable Ribbon and The Rubber Cafe Blog Hop!


If you just happened to stop by my blog today and would like to start from the beginning, click on The Rubber cafe link HERE to start from the beginning. If you've come from Corri's blog then you are in the right spot!

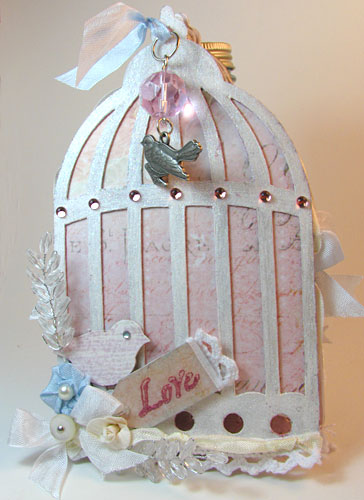
For my project, I worked up a mini-album using some gorgeous ribbons and trims from Really Reasonable Ribbon and some of my favorite stamps from The Rubber Cafe. You know Mother's Day is just around the corner and this album would be a great gift idea!


I LOVE this birdcage and as soon as I received it, I knew I wanted to use it for this hop. There's plenty of room for embellishments, photos, and journaling. That's perfect when playing with ribbon and stamps! Here's how I made the album.

I first painted it with Eco Green Crafts White paint. . .


  and then glittered the inside front cover with You're So Fine Glitter, Princess Pink


 and the outside in YSF Glitter, Diamond Clear Cool Highlight.
  

Next I used one of my favorite tools, the Stick Em Up Tool, to place the Jellie Dots, Cotton Candy along the top bar of the cage.


Isn't that gorgeous against the glitter??!


I then went to work with those GORGEOUS ribbons! Look at how beautiful they are. I used the Light Blue Seam Binding to make a satin ribbon flower. These flowers are really quick and easy when using homemade glue dots from the Scrap Happy Glue.

Next I tied a bow with the White Seam Binding and started to work on my love tag.


Since I couldn't find exactly what I had in mind in my stash, I decided to just make my own tag. Did you know that you can stamp with Scrap Happy Glue?  Well you can and I LOVE that!


I stamped the Love sentiment from the Fabulous Phrases set using the glue and then burnished the Princess Pink You're So Fine Glitter with my finger. Then I topped it off with a little bit of Diamond Glaze and voila. . . a homemade tag that's perfect for your project!


I also added some beautiful Amelia White Crochet Lace to the bottom of the birdcage along with some Cream Seam Binding.

Next I started working on the inside pages of my album. Here I used the Cream Seam Binding again but I knotted it every few inches to give it some interest. I really like the look of the ribbon this way.


I also used my Spellbinder Grand Calibur and the Labels Four Small 2 Die to create a tag for a photo or memorabilia.


I created another photo mat by using that same die and our Background Basic 2 stamp. That stamp is perfect for creating journal lines but it's also great for customizing your own background paper too. Then I just pleated and glued some more of the Cream Seam Binding.


I used this same technique for the paper on this mini-pocket. On my cardstock I stamped Tim Holtz Distress Ink Aged Paper with the 18th Century Proclamation stamp to get just the right look I was going for. I trimmed it with a fussy cut doily and added Jellie Dots Pearls as an accent.

Speaking of pockets . . I also created several pockets using the ribbon. Here are just a few of them:


See how easy it is to create a mock pocket?  The tag I stamped with the Roaring 20's Placard stamp. I'll be adding more photos and accessories as I complete my album.


You could tuck many tags under the White Satin Ribbon here!

Sometimes when working on a larger project, you might find yourself in a pinch and run out of the perfect paper for your theme. Well don't worry. Use your stamps and embossing powders to customize your paper.


Since I have birds and butterflies in this album, I used the beautiful butterfly from the Butterfly Set to create the embossed image.


Next I needed to make another flower so I chose to use some more of the Amelia White Crochet Lace.


The center is simply a smaller tighter version in Cream Seam Binding. I think they are really cute together. If you haven't seen how to make these flowers with the Scrap Happy Glue, you should watch Melissa's video. Lots of tips and tricks there. It's a must see.

I'll leave you with a few more pictures of the last few pages. 


On the back cover I used Diamond Glaze to give her wings some added dimension.


and on the front I made a charm out of a Tim Holtz finding and a glass bead I had in my stash.


I do hope you've enjoyed my project and I hope it gets you motivated to create that special gift for someone on Mother's Day! 

Supplies Used:

Cardstock: Prima Fairy Belle collection
Stamps: The Rubber Cafe Background Basic 2, 18th Century Proclamation, Roaring 20's Placard, Vintage Treasures, Steampunk Charity Wings, Butterfly Set, Fabulous Phrases
Ink: Tim Holtz Old Paper, Spun Sugar, Eco Green Crafts White paint.
Glue: The Rubber Cafe Scrap Happy Glue
Ribbon: Really Reasonable Ribbon Cream Seam Binding, Light Blue Seam Binding, White Seam Binding, Amelia White Crochet Lace, White Satin Ribbon
Accessories: The Rubber Cafe You're So Fine Glitter, Princess Pink, YSF Glitter, Diamond Clear Cool Highlight,  Stick Em Up Tool, Jellie Dots, Cotton Candy, Jellie Dots, Crystal Clear, Jellie Dots Pearl, Tim Holtz charm, beads from stash
Dies: Spellbinders Grand Calibur,  Labels Four Small 2, Labels One

PRIZE: 

Yes I am giving away a little prize worth $15 in scrapping supplies! I am putting together a little kit of some of my favorite papers and goodies to one lucky winner. Just be sure to leave a comment on all the blogs in this hop and become a follower to be eligible! I will pick a winner via RANDOM.org and announce it in one week. GOOD LUCK!!

You're next stop on the blog hop is

CHERYL

Have fun!

~ Michele

Blog contents © Creative Mayhem 2010. Blogger Theme by Nymphont.